Fair Warning .......

After all the kerfuffle having to change over to a new blog earlier on in the year, producing posts has not been as easy or fun as it used to be. Since Live Writer died, the positioning of pictures has become the real bane of my life, so after 15 odd years of pretty consistent blogging I've decided that from January 1st 2025 I shall be going out to pasture! I may still post the odd picture or two as a record of my latest project, but I won't be writing up or photographing any of the process, because, sometimes, that can actually take longer than the making itself. As a blogger, I am now something of a dinosaur, if I were starting out now I'd have my own YouTube channel, but with my Brummie accent, I don't think the world would still ever be quite ready for that! Anyway, with six months to go, there's still plenty of time for a few more projects and ideas so let's see what happens .........

Monday, 29 April 2024

Toadstool Christmas Tree Ornament.

 Another toadstool project for your delectation today ........


........using a mould from Temu, that I believe cost £1.68 but, as with all things  Temu, the prices can change from day to day, so it's always best to shop around before making a purchase.


I started by using Crayola Model Magic to mould the toadstools.


I then painted the caps red with two coats of red from an emulsion match pot (Wilko, sadly no more).  


In the meantime I stuck a little grass powder (Temu £1.18 for a 10g  pack) to add a little texture to the decoration, rather than glitter.


I then varnished the toadstools around 4 times with clear, glossy, quick dry varnish (from Wickes).  I did this separately because I didn't want any of the grass fibres getting into the varnished layers. I also smudged a light brown Whisper pen on the stem and the underside of the cap to make it look more realistic, it looked a bit heavy to start with, but when varnished it almost disappeared. 


Also, on this occassion, I decided to leave the wood slice unvarnished as I wasn't sure if it actually added anything to the overall finished effect.


When the vanish was dry, I stuck the toadstools onto a 6 -7 cm wood slices (again Temu), using Hard As Nails for a really secure fix.


When the toadstools were safely in place, I used Dovecraft, white, 3D Enamel Effect ..........


......... to add the spots to the caps.


All I had to do then was add a few clusters of three, tiny, silver, flat back gems here and there for a little festive bling and finally put a small, silver screw eye hook in the top of the wood slice so that the decorations can be hung.


Et voila, not an awful lot too them, most of the time was spent waiting for the various components to harden or dry.


However, I have to admit I have developed a "thing" for toadstools/mushrooms ......


..... and now have a slightly bigger, but not so deep mould to play with ....... I am thinking perhaps a decorated, shallow fairyland bowl/dish, if I can find?  

Monday, 22 April 2024

Mini Halloween Domes

Some more hanging domes today, this time with a Halloween bent and probably destined to be sent to Marc. 


The 7cm x 3cm glass domes came from Temu (£4.94 for a pack of 10), the large skull beads from bracelet from a charity shop bracelet that cost me about 99p, the spools are from La Blanche (a gift from Marc), the crowns I've had for a while, probably from eBay and the metal, nail art snakes from Temu again (10 for 89p). 


I started by gluing the crowns to the skulls using E-7000 for a secure fix and then while glue was setting, coloured the spools with a black permanent pen.


I also covered the top of the cork seal with an ultra fine purple glitter.


When everything I was dry, I inserted part of a broken cocktail stick through the skull with a little glue and then stuck the skull onto the spool.


Then I stuck another broken cocktail stick into the cork seal, before putting some glue on the bottom of the spool and sticking it over the cocktail stick to keep everything in place and secure.


When everything was dry again, I added some Dovecraft 3D enamel to make things look a little more gruesome, however I thought the effect cheapened (???) the overall macabre look I was aiming for. I also decided to put a metal spacer bead under the skull, but I'm not that sure that worked either!


Then came the snakes, but they looked too bright and not dark enough for the theme ....... 


...... so, unsure that I wasn't about to completely ruin all my hard work so far, I dabbed and smudged the bright green goo with a darker green Sharpie pen, doing the same with the collar and snake in brown.


I think it's better, but something still isn't right, but I'm leaving it here otherwise they'll only be fit for the bin. 


I think, really, it's a back to the drawing board jobbie. Everything needs to be a little higher up in the dome, the collar isn't right, should it be substituted for a larger round top on the spool, or the head set at a weirder angle, perhaps the eyes need to be just left black and hollow ....... if I have the patience to return to the idea, perhaps we'll see in time!

Monday, 15 April 2024

Mushroom Houses Decorations

And ....... it's still more toadstools today I'm afraid, this time in the guise of fairy houses .....


...... made using Amazing Casting Resin and a silicone mould found on Temu for £1.29. 


The resin cures within about 10 minutes and dries with a white finish, ready to paint (?).


However, although I sanded the houses down on both sides before painting, the emulsion matchpots I used (red for the roof and white for the body) still chipped here and there, so once the two coats of paint were on and dry, I then added two more coats of glossy, clear, quick dry varnish (Wickes) as quickly as I could, to avoid any more possible scrapes ......


....... before adding the details on the door and window using a brown Sharpie pen.


To accentuate the spots on the roof, I painted over them several times with white paint, wiping most of it off after each application, to leave just the rings, and then varnished over them again, just to be on the safe side.


I painted the backs to match and added a small pendant bail at the top so that the houses can be hung.  I drew spots on the back of the roof to match the front using a white, fine tipped, acrylic paint pen.


Then came  the fiddle fart, first doodling the greenery again using acrylic pens in two shades of green, before adding the tiny acrylic flowers (Temu 88p for 100) using B-7000 for a really secure fix.


....... doing the same on the back.


I'm really please with how they turned out, I LOVE the resin, I just need to find the right paint to use on it ......


 ...... Sharpie pens work, but the depth and solidity of colour isn't there, if that makes sense, any suggestions?

I also think I could adapt the idea for Christmas, a bit of faux snow and some tiny, resin/fimo holly leaves(?) if I can find any or perhaps tiny fimo, nail art, candy canes and peppermint whirls? We shall see.

Monday, 8 April 2024

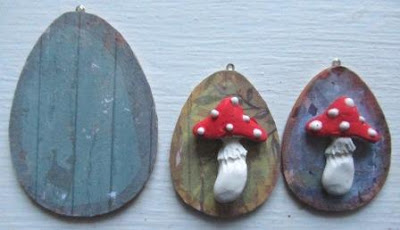
Easter Toadstool Hanging Decorations/Gift Tags

More toadstools today .......


..... this time with Eas
ter in mind ........


...... using the small, silicone, toadstool mould I got from Temu ......


....... and a few flat, wooden egg shapes covered on both sides with papers from a 6" x 6" Delightful Daisies paper pad from Crafters Companion.


I then glued on the already painted toadstools (left over from another project) using Hard As Nails for a really secure fix, before varnishing both sides several times, with Wickes clear, glossy, quick dry varnish.  But then I left them for a week or so because I knew they needed something else, but couldn't think what.


Then ..... I remembered a small pot of gold flakes I'd had for a while.  


I didn't really have a clue how to use them, but lightly covered the varnished paper with watered down PVA glue and simply brushed the gold flakes over it, the flakes broke up a little, stuck and voila  ....... it worked!


The effect was magical and I'm already thinking that I might be able to repeat the idea again but for Christmas, using a flat, wooden, bauble shape in place of the eggs and perhaps adding a little translucent ultra fine glitter to the toadstool caps for a frosty, winter effect?


So, for now, it's back to the drawing board ...........  

Monday, 1 April 2024

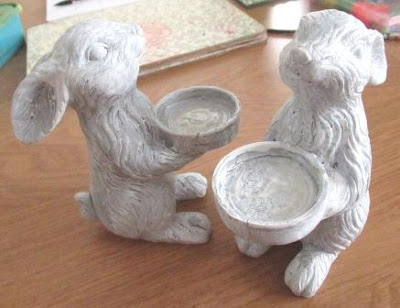
Revamped Bunny Tealight Holders

Happy Easter! 

I've had these Easter Bunny tealight holders for a couple of years now (Home Bargains, costing no more than £1.50, if that) and, to be honest, they were heading to the nearest charity shop this year to find a new home ...........


....... but then they got a reprieve ........


.... as I decided to zhuzh them up ..........


...... first by painting them very quickly, all over, with household emulsion paint ........


...... followed by dry brushing them, equally quickly, with white paint to give them a little extra depth and texture ........


 ...... before finally, using my index finger to wax them all over in gold.


I think they work .......


..... so they will probably now be around for a couple more years Easters after all!