Fair Warning .......

After all the kerfuffle having to change over to a new blog earlier on in the year, producing posts has not been as easy or fun as it used to be. Since Live Writer died, the positioning of pictures has become the real bane of my life, so after 15 odd years of pretty consistent blogging I've decided that from January 1st 2025 I shall be going out to pasture! I may still post the odd picture or two as a record of my latest project, but I won't be writing up or photographing any of the process, because, sometimes, that can actually take longer than the making itself. As a blogger, I am now something of a dinosaur, if I were starting out now I'd have my own YouTube channel, but with my Brummie accent, I don't think the world would still ever be quite ready for that! Anyway, with six months to go, there's still plenty of time for a few more projects and ideas so let's see what happens .........

Monday 22 July 2024

Taking A Break ............

Hi there,

Just to let you know I'm taking a break from blogging for the next little while, probably until the end of September, as I've really not been in the mood just lately and have as such relied on a whole host of scheduled posts to keep going this far, (last post until then below).

The school holidays have just started, during which I'm planning having yet another cull of my craft room, hopefully it will either inspire me to continue or tell me enough is finally enough.  We shall see.........

Another Little Panda Frame for Iris

I'm sorry, yet another Panda frame today, Iris really is a girl who loves pandas! 


And again, there's not a lot to it.


My apologies as I can't remember where the shallow, wooden, 4.5ins square tray came from (probably just a random purchase sometime), however the rhinestone panda came from Temu (£1.31), as were the tiny resin flowers (100 pieces for approx. 98p -  but Temu the prices have a habit of almost changing daily!).


I simply gave the frame two coats of gold acrylic paint .......


..... before gluing a piece of greenish, patterned, scrap paper in the centre to act as a background, swiftly followed by the panda (which is backed on a thick plastic film) using B7000 glue.


I was going to leave it like that, but it did look rather plain, so I added some faux stitching round the edges plus clutters of three dots here and there, followed by the resin flowers ........


...... making it much more appealing to hang in Iris's very, very, very pandary bedroom! 

Monday 15 July 2024

Swimmer Broochs/Pins

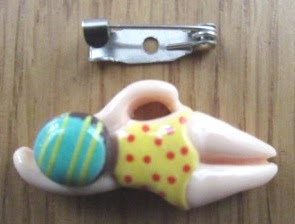
I just couldn't resist these little resin swimmers from Temu (£1.68 for a pack of 12 - but prices can vary on Temu from day to day).

But what to do with them?  Well, the children's school has had a temporary swimming pool installed on site, as it worked out cheaper than busing everyone up to the leisure centre and back, however, it's been a bit of a military operation for the staff, so I thought it might be a cute idea, as a memory, to turn the figures into pin badges for their lanyards.

 No great shakes for this idea then ........

......... I simply stuck a tiny 1.5cm brooch fastening onto the back of each swimmer using B-7000 glue.  

I would have perhaps preferred to use butterfly clutch fastenings, but they were just a little too big.

When the glue was set I pinned the swimmers onto a scrap of blue card to complete the "look"!  Perhaps if I'd given myself more time, I could have edged the cards with white, wavy lines? 

I love the figures so much I've ordered another set as I thought I could make a couple of small canvases that look like swimmers doing lengths in a swimming pool?  We shall see ..........

Monday 8 July 2024

Small Panda Frame

 Following on from last week, another very simple panda frame for Iris's birthday ........


..... there's note an awful lot to it, using a small, 50p, charity shop, wooden picture frame and a £1.28 panda brooch from Temu, so still cheaper than actually buying a birthday card!


I started by taking the picture and glass out of the frame, before giving it two coats of gold acyclic paint and clipping the fastener etc. off the back of the brooch.


When the frame was dry, I replaced the original picture with a scrap of pale blue, subtlety patterned paper for the new background and putting the glass back too.


I then carefully glued the panda onto the glass using B-7000 glue, not touching it again until I knew the glue had really dried and the panda wouldn't move without a struggle.


It looked OK and that's when I left it for a day or two, before thinking perhaps it needed a cloud or two, remembering some tiny stickers I bought a couple of years ago.


Well, the clouds looked pants, but I liked the effect of the trees on the glass and at either side of the frame, adding a little varnish to keep them in place for good measure.


Not an awful lot to it I know, but a certain little madam, who just adores pandas, was well chuffed.

Monday 1 July 2024

Just A Girl Who Loves Pandas

This is what I made for Iris in way of a card for her 10th Birthday, as she is totally obsessed by pandas! 


I got the box frame from Temu, it was a little on the spendy side at £3.48, but when I compared it to the frames I would normally use (usually the boxes small wooden embellishments come in), they are quite a bit bigger and I really like the larger space at the top to put a title etc.


The pandas are Croc clog embellishments (again from Temu), they have a stud on the back that you poke through the holes in the clogs, but which are also perfect for using as a base for the glue and add a little extra dimension to the project.


I started by cutting squares from scraps of patterned paper to use as a background for all the compartments before adding said pandas.


I cut an oblong of spotty paper for the larger compartment, using my trusty, old Dymo printer to write the sentiment, adding a little faux stitching round the edge of the paper, as I did for the smaller squares.


I then backed this onto a piece of card for extra rigidity, with a double layer of sticky pads on the back before sticking it into the frame, this added dimension, rather than having it lie flat in the back of the space, if that makes sense?


I also edged the dividers and sides of the frame using a purple Sharpie pen .....


...... covered the sides with the same spotty paper, adding a purple edge to them too.........


...... before finishing the whole thing off by embellishing it here and there with red, flat back gems and silver nail art hearts.
.

There's not an awful lot to it to be honest, it only took me about 45 mins .......


...... but it's more of a lasting memory than a card that's soon put away, forgotten about and eventually thrown away.

Note to self ..... if I were to do this again, I might also colour the inside of each compartment?