Fair Warning .......

After all the kerfuffle having to change over to a new blog earlier on in the year, producing posts has not been as easy or fun as it used to be. Since Live Writer died, the positioning of pictures has become the real bane of my life, so after 15 odd years of pretty consistent blogging I've decided that from January 1st 2025 I shall be going out to pasture! I may still post the odd picture or two as a record of my latest project, but I won't be writing up or photographing any of the process, because, sometimes, that can actually take longer than the making itself. As a blogger, I am now something of a dinosaur, if I were starting out now I'd have my own YouTube channel, but with my Brummie accent, I don't think the world would still ever be quite ready for that! Anyway, with six months to go, there's still plenty of time for a few more projects and ideas so let's see what happens .........

Tuesday, 27 February 2024

A Few More Leaping Hares

A few more leaping hares today as an extra post, using my IOD "Primitive" mould after I thought the Easter branches I put together needed just a few more.


I also decided it wouldn't hurt to add a couple of new colours, in this instance purple and lilac .....


....... followed by a light, dry brushing all over with a white paint .........


...... and a couple of coats of clear, glossy, quick dry varnish ......


 ....... before finally finishing with a mix of several shades of gold wax, applied with my finger, which I'm not sure is the right thing to do, but it seemed to work. The wax absolutely transformed the hares, giving them a lovely, rich, aged look.


There's a lot of waiting in between all the stages, but I am definitely looking at making another dozen or so gold ones for Marc's Christmas tree next year, as a special "thank you" for putting me on this crazy mould/resin type journey that seems to have taken over all my crafting since the start of the year, bless him!

Monday, 26 February 2024

Tiny Toadstool Hanging Dome Decorations

I hope you're not too sick of toadstools yet! 


This idea was a long time in the making, I had a basic idea and collected all the bits and pieces I needed, only to be then scuppered when I couldn't work out how to actually hang them, mainly due to my complete ignorance of jewellery making findings! 


I tried to codge something together using a metal spacer bead and a loop of silver wire (don't ask!), but it was such a fiddle fart I quickly realised that I wouldn't have the patience to make it work, so off to Google I trolleyed, trying lots of word combinations with "bail" as the common denominator, until I finally hit upon "bead cap pendant bail" 


.........  and after another search on Temu, secured several packs of 10 such bails for £1.26 (per pack), with fingers crossed that they would work, waiting, with baited breath, for them to arrive.


When they arrived I was really chuffed, securing them to the top of the tiny glass domes that cost £8.99 for a box of 20 (sorry, if I sound like a Temu stuck record).  using E600 to ensure a secure fix.


I cut circles from a piece of "fake" grass, using the smaller end of one of the corks as a template ........


..... before using E6000 to glue the pieces to the corks.....


...... followed by the tiny foam toadstools .......


...... before finally putting the domes over to cover the whole affair.


I would really love to make some more of these, as they are really cute and a little bit different for hanging on the Christmas tree ........


...... however, there were only ten of this sized dome in my order and finding more on Temu for is proving rather difficult, as the ones I originally I bought have since been discontinued, aghhhh,  I'll just have to keep on looking and buy any I find as soon as I see them, lesson learned!

Tuesday, 20 February 2024

The Works - Easter Crafts - Carrot Decorations

Just a quick heads up .........


I quite like these "string" carrots I found in The Works the other day, simply hung on an Easter tree or a vase of bare branches.......

...... or, I am thinking, remove the orange ribbons and stick the carrots round a circular wreath, with a few Easter coloured flowers scattered here and there, for which I might possibly need to get another pack? 

£1 for a pack of 6, which I didn't think was too bad, as they are quite substantial and well put together. 

Monday, 19 February 2024

Iron Orchid Designs Primitive Mould & Amazing Resin Casting - Leaping Hare Hanging Easter Ornaments


I have two new toys ..........


....... the "Primitive" mould from Iron Orchid Designs..........


....... and a pack of Amazing Casting Resin, so bear with me, this is a totally experimental post, where even I don't know where it's going.


I chose the Primitive mould because I thought it would work well with my other Ginger Spice one and because there were matching left and right impressions  that I thought might be interesting, which is why I chose to work with the leaping hare first.


The beauty of the Amazing Casting Resin is that it cures in about 10 minutes which is a game changer for me, no waiting for ages to see how anything turns out.  You mix 1 to 1 of each bottle, stir thoroughly for 30 seconds and then pour into your mould, and as it sets, the resin changes from transparent to white, then you know it's cured.


The impressions were brilliant, so detailed, that's when I decided to see if I could turn the hares into an Easter hanging ornament, by gluing both sides together with E6000, putting a tiny pendant bail on the inside to hang it from.


They turned out pretty OK and the bail was perfectly placed so the hare balanced pretty straight when hung, although that didn't really matter that much, as I thought they'd look good leaping at different angles when hung on some Easter branches.


With this success I proceeded to make another 5 hares, which didn't take that long with such a quick curing time, b
ut what to do with them then? I didn't want to leave them white, but how would they paint?  After a little research I found that the best paint to use would be acrylic ..... so off I went again, with a lot of waiting for them to dry.


I gave them two rough coats, perhaps they were a bit patchy, but the colours were a bit too bright, so not really knowing where I was going with the idea I then dry bushed them, using my tattiest paint brush with white emulsion(?).


I was liking the effect, it sort of "aged" them .........

 
....then I wondered about adding some gold, as a reflection a past opulence ..........


And though subtle (top rabbit), I also thought it worked but that's when I left them to got charity shop shopping! 
When I got back, they looked a little pale and pasty, with out any real substance, if you know what I mean but wondered about waxing them, using a set of rubbing wax that I've had for a million years but never used, because I didn't know how to! 


This was the missing key, I simply rubbed over the hare with my finger, and that's when they took on a whole new "proper" aged look .......


I was thrilled, all through playing and referencing bits and pieces I'd picked up from Marley https://www.madebymarley.co.uk/.


The only thing I'm not sure of is the eye, I wanted to add a tiny flat back gem, but is it an unnecessary detail?


Anyway, they are all ready for Easter!

Monday, 12 February 2024

Wood Slice Toadstool Tree Decoration.

 I am really chuffed with how these little decorations have turned out ........


Made using wood slices (5 - 6cm) from Temu that cost £1.34 for a pack of 10 and the silicon mould that was £1.38 (but with Temu the prices are constantly changing, so it's always worth shopping round before actually buying anything).


I started by making a pile of toadstools using white Crayola Model Magic.


I left them for a week to dry out thoroughly and because it was around the time I needed to sort out a new blog (say no more). They dried without any cracks and with very few causalities, but any of these would be easy to patch up and disguise when glued to a flat surface.


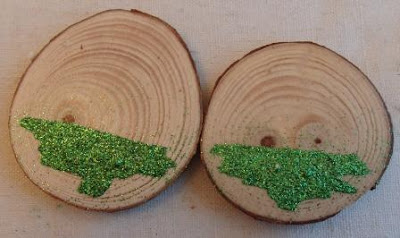
In the meantime, I put grass on the front of the wood slices using a generous sprinkle of an ultra fine, green glitter and PVA glue to stick it down, after first checking that the mushrooms would actually fit the slices.


I then gave the toadstool caps two good coats of a red acrylic paint, leaving the stems unpainted ........


...... before sticking them onto the wood slices using Hard as Nails for a really secure fix.


I used white, Dovecraft 3D Enamel Effects for the spots on the caps to give a little extra dimension and that's when they started to come together.


However, the stems at this stage looked a little too bright ..........


...... so I sort of smudged them with a very light brown Whisper pen, I wasn't sure about this at first, but when I started varnishing the decorations it really made a lovely subtle difference, making the toadstools look much more realistic.


In all I gave the whole front of the decorations four coats of varnish ..........


...... with very pleasing results, they almost looked ceramic.


To fill in some of the empty space I added clusters of three, tiny, clear, flat backed gems here and there to add a little magic to the overall effect.  Finally I put a small eye hook screw in the top to hang the decorations from.


I understand that toadstools are very en trend at the moment and as I have another couple of moulds I have yet to use (also from Temu) I guess you'll be seeing quite a few other ideas using them over the next few months, so watch this space! 

Monday, 5 February 2024

Decoupaged Travel Bag/Child's Suitcase – Part Two

Well, it’s done ………..


I’ll be honest, I’m not sure if I didn’t try to be too clever or too artsy.  I think I need to step away from it for a while, put it in the wardrobe until I need it, then see how I feel about it then. I like it, but it’s not my style.


However, in all this indecision I really can’t believe I didn’t take any photos of the process, so I am right royally fed up.

Last week I left you with the sides to be done, after giving them a rough painting beforehand.  I found it was easier to add a straight edge to the torn strips of paper, making it easier to work round the edges of the case. The jagged edge on the other side of the paper helped to maintain the effect on the front and back of the case, if that makes sense.


When the sides and bottom were covered it was just a matter of varnishing, varnishing, varnishing with Wickes quick dry, clear glossy varnish.  I was worried about how this would effect the fabric strapping round the case, but it was perfect, the paint didn’t run and the material took on a new glossy, solid plastically look.  I lost count of all the varnish layers after four, but I knew I wanted the case to stand up to a good bashing!


During the glossing process I fiddle farted with the overall look of the case some more, by adding a few clear toilet seat stickers from Temu (58p a sheet), goodness only knows why!


Although they blended, perhaps a little too well into the overall look, they did add a sort of extra layer, with the paper underneath showing through. However, where they were more effective was over the fabric strapping and some of the hardware, where they joined the pattern of the front, back and sides together, making it more cohesive(?) 


A little more varnish and then the case was ready to have the splashes of paint, glue and varnish removed from where it shouldn’t have been, ready to be photographed.


As I said, I do like it, it’s different, however, it’s right out of my comfort zone with the colours. Yes, I have my signature turquoise, but I am not at all keen on the green effect. I think if I’d used turquoise to go over the jagged lines the effect might have been more appealing.  

I also wish the flowers popped more, so I am not ruling out adding some biggish, blousy red flowers if I can find a suitable decoupage paper or image to print off, we shall see. 


For now, it’s all set for a overnight stay in Cheltenham, when Lu and I go to see Ross Noble, two/three years after the original show was cancelled because of, you’ve guessed it, flipping Covid!